Succulents have become more and more famous in latest years, way to their precise shapes, shades, and smooth-to-care-for nature. but, like every plants, succulents will sooner or later outgrow their field and require repotting to maintain to thrive. Repotting can seem daunting, mainly for novices, but with the right steering and equipment, it is able to be a simple and rewarding process. In this article, we will learn how to repot succulents and we are able to offer step-with the aid of-step instructions and recommendations for efficaciously repotting your succulents, a good way to continue to grow and flourish. From signs and symptoms that your succulent desires repotting to selecting the proper soil and box, to aftercare for your repotted plant, we have got you included. So grasp your gloves and trowel, and let’s get started out on giving your succulent a new domestic!

When should you repot succulent
Succulents are recognised for their easy-to-care-for nature, but like any plant life, they will sooner or later outgrow their field and need repotting to hold to thrive. So how can you tell if your succulent needs repotting? here are a few signs to appearance out for:
1. Root-bound plant: when succulents are left of their bins for an prolonged duration, they sooner or later outgrow their pots, and their roots come to be root-sure. this indicates the roots have grown so much that they now not have any room to unfold out, causing them to wrap around every other and develop in circles. A root-sure succulent is unable to absorb enough water and nutrients, leading to stunted growth and terrible health. right here are some symptoms that your succulent desires repotting because of being root-sure:
2. Slow Growth: in case your succulent is not developing on the equal charge because it used to, this can be an indication that the plant has outgrown its box, and its roots are struggling to soak up sufficient vitamins.
3. Crowded Roots: lightly take away your succulent from its container and inspect the roots. if you be aware that the roots are circling around the edges of the pot or are tightly packed, it’s a clean signal that your succulent is root-bound and needs repotting.
4. Water-related problems: in case your succulent isn’t soaking up sufficient water, it is able to show symptoms of dehydration, which include shriveling, yellowing, or drooping leaves. then again, if the soil remains wet for an extended duration, it could imply that the roots aren’t functioning efficiently, and the succulent desires repotting.
5. Overgrown plant: in case your succulent is beginning to appearance too big for its pot, it is an amazing sign that it’s time to repot. Overgrown plants may also start to lean or topple over, that may damage the plant and its roots.
6. poor drainage: in case your succulent isn’t always draining properly or is sitting in water for extended durations, it could be a signal that the soil is compacted and needs to be changed.
7. Yellowing leaves: Yellowing leaves can be a signal of a selection of problems, such as overwatering or nutrient deficiency. if you have dominated out these problems and the yellowing persists, it may be a signal that the plant wishes repotting.
8. Drying out too quickly: in case your succulent is drying out too quick, it is able to be a sign that the soil is depleted and needs to be refreshed. this will take place if the plant has been in the identical pot for an prolonged duration or if the soil isn’t always properly-draining.
average, repotting your succulent can assist it develop and thrive, so if you word any of these signs, it’s time to present your plant a new home.
Choosing the Right Soil and Container for repot your succulent

Repotting your succulent is an vital step in ensuring its healthful boom. however, choosing the right soil and box is similarly important. right here are a few tips to help you pick the right soil and container for repotting your succulent.
Soil: selecting the excellent soil is important in relation to repotting your succulent. Succulents are exclusive from other vegetation as they save water of their leaves, stems, and roots. therefore, they need soil that drains well and doesn’t preserve an excessive amount of moisture.
here are some reasons why the proper soil is crucial for repotting your succulent:
1. Drainage: Succulents don’t like to take a seat in water, and soil that keeps moisture can cause root rot. The right soil ought to permit water to empty out quickly and effectively.
2. nutrients: Succulents need vitamins to thrive, but they do not require a number of fertilization. The proper soil ought to have the right balance of vitamins to support your plant’s boom without overfeeding it.
3. Aeration: The right soil must also allow air to circulate round your plant’s roots. this is critical for healthy root growth and may assist prevent fungal sicknesses.
4. pH level: Succulents pick barely acidic soil with a pH among 6.zero and six.five. The proper soil ought to have a pH stage that is appropriate for your plant’s wishes.
while repotting your succulent, you could make your personal soil mix via combining potting soil, perlite, and sand. you can additionally buy pre-made succulent soil mix from your nearby garden center or on-line.
In summary, choosing the right soil for your succulent is crucial for its overall health and growth. The right soil should have good drainage, the right balance of nutrients, allow air to circulate around the roots, and have an appropriate pH level. By using the right soil, you can ensure that your succulent thrives and continues to be a beautiful addition to your home or garden.
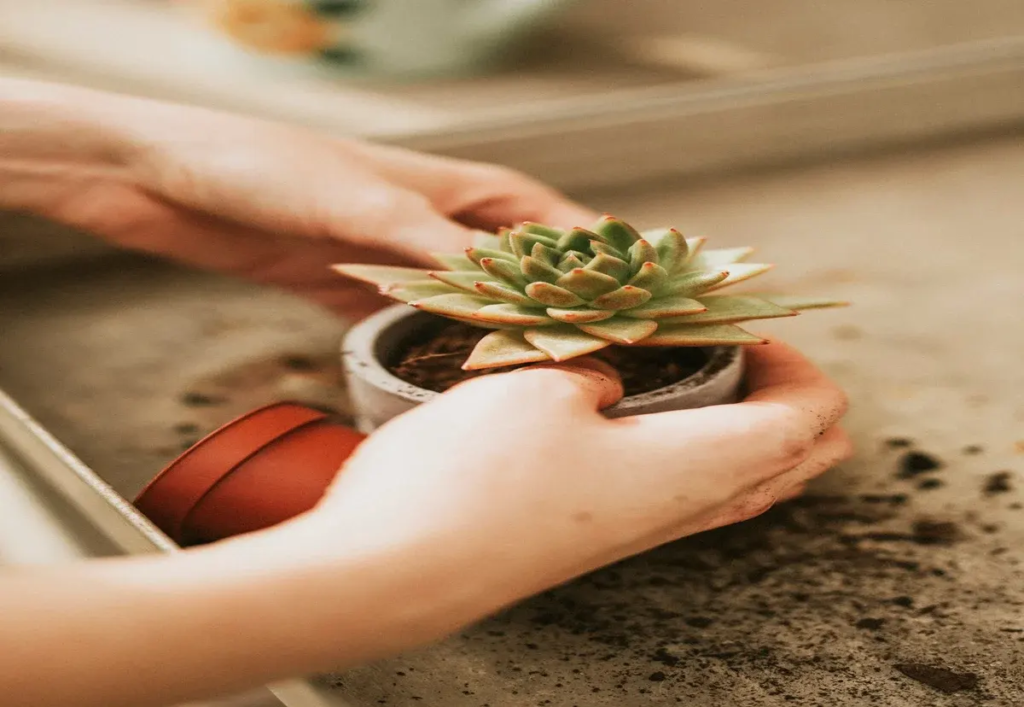
Container: Choosing the right container is essential for repotting your succulent. Succulents are popular houseplants that require well-draining soil and a container that promotes healthy root growth. The right container can ensure that your succulent stays healthy and thriving. Here are some reasons why the right container is important for repotting your succulent:
- Drainage: Succulents are adapted to arid conditions and need soil that drains well to prevent root rot. The right container will have drainage holes that allow excess water to drain out. Without proper drainage, excess water can accumulate in the soil and cause the roots to rot, leading to the death of the plant.
- Size: The container size is also important when repotting your succulent. If the container is too small, the roots can become overcrowded, leading to poor growth and nutrient uptake. On the other hand, if the container is too large, it can hold too much moisture, causing the soil to remain wet and lead to root rot.
- Material: The material of the container also plays a role in promoting healthy growth for your succulent. Terracotta pots are a popular choice for succulent plants as they are porous and allow air to circulate around the roots. This helps to prevent the soil from becoming waterlogged and encourages healthy root growth. Plastic containers can also be used, but it’s important to ensure that they have drainage holes.
- Aesthetic: The right container can also enhance the aesthetic appeal of your succulent. Succulents come in a variety of shapes, sizes, and colors, and selecting a container that complements the plant’s natural beauty can make a big difference in the overall appearance of the plant.
the right container is crucial when repotting your succulent. It ensures proper drainage, size, material, and aesthetic appeal, all of which contribute to the healthy growth and longevity of your plant. Be sure to choose a container that meets these criteria to keep your succulent thriving.
Top of Form
choosing the right soil and container for your succulent is essential for its health and growth. By selecting a well-draining soil mix and a container with proper drainage, you can ensure that your succulent has the best chance of thriving in its new home.
Basic supplies needed for repotting succulents
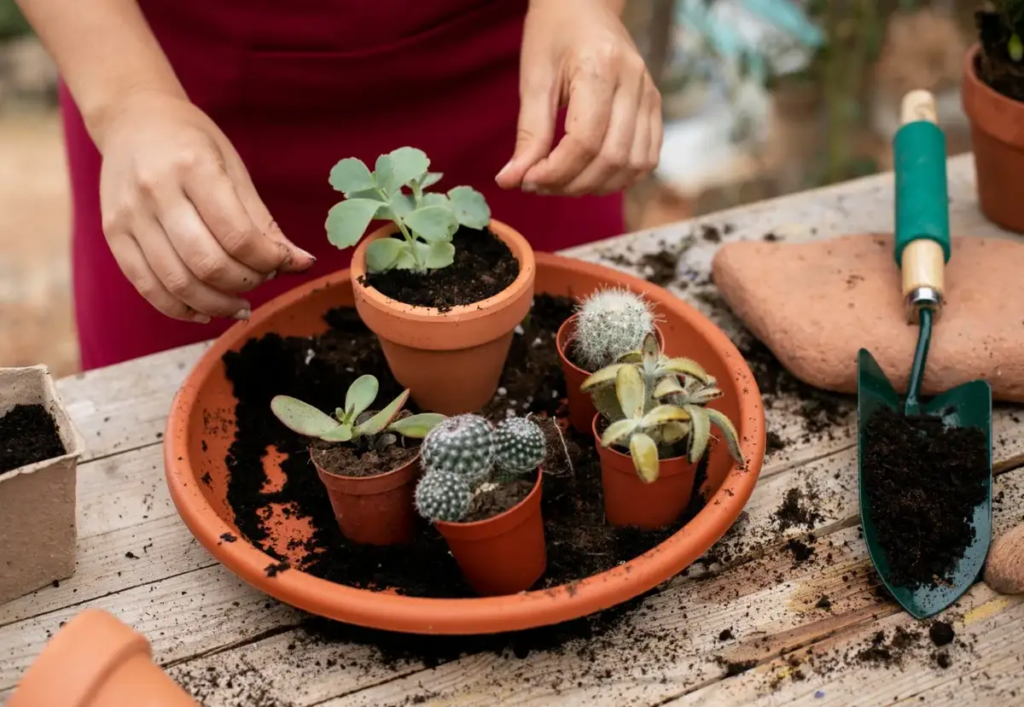
Repotting your succulents is an essential part of their care and growth. It’s important to have the right supplies to ensure a successful and healthy transplant. Here are some of the supplies you’ll need for repotting succulents:
- Potting mix: Succulents require a well-draining soil mix that allows excess water to drain quickly. A good potting mix should contain a combination of coarse sand, perlite, and organic matter such as coconut coir or peat moss.
- Container: The right container is also essential for repotting succulents. It should have drainage holes to allow excess water to drain out and be made of a material that promotes healthy root growth, such as terracotta or plastic.
- Trowel or scoop: You’ll need a tool to scoop the potting mix into the container. A small trowel or scoop is perfect for this job and can help you pack the soil around the roots of the succulent.
- Gloves: It’s a good idea to wear gloves when repotting your succulent to protect your hands from any sharp edges on the container or plant. Gloves also help prevent the transfer of harmful bacteria or diseases from your hands to the plant.
- Watering can: After repotting your succulent, you’ll need to water it thoroughly. A watering can with a long spout is useful for reaching the soil without disturbing the plant.
- Pruning shears: If your succulent has any dead or damaged leaves, it’s a good idea to trim them before repotting. A pair of pruning shears can help you do this easily and precisely.
these are the basic supplies you’ll need for repotting your succulent. Make sure to have all of these items on hand before you start to ensure a successful transplant and healthy growth for your plant.
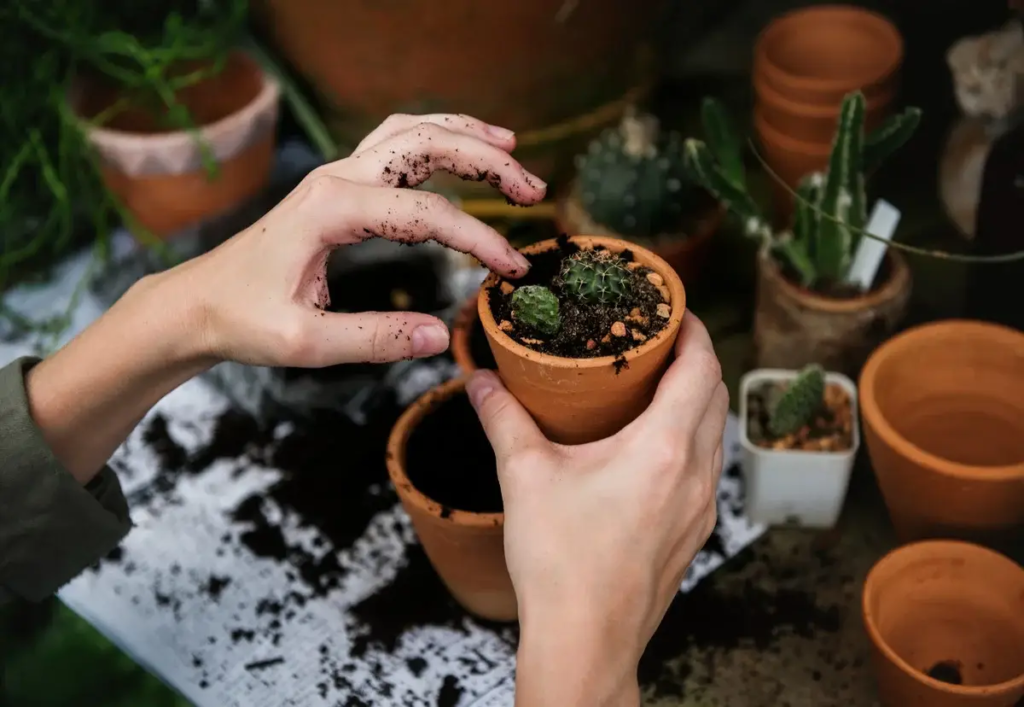
how to safely remove the succulent from its old pot
Removing a succulent from its old pot can be a delicate process, but with the right tools and techniques, it can be done safely and without damaging the plant. Here’s how to remove a succulent from its old pot:
1. Water the succulent: it’s a good idea to water the succulent an afternoon or before repotting. this can make it less complicated to eliminate the plant from the antique pot and help prevent harm to the roots.
2. Prepare the new pot: before disposing of the succulent from its antique pot, prepare the new pot via adding a layer of potting mix to the bottom. this could help provide a stable basis for the plant and make certain proper drainage.
3. Loosen the soil: gently squeeze the sides of the antique pot to loosen the soil and roots. you could also use a trowel or fork to loosen the soil round the rims of the pot.
4. Remove the succulent: carefully turn the vintage pot on its facet and faucet the bottom of the pot to loosen the soil and roots. maintain the succulent through the stem or base of the plant and lightly wiggle it out of the pot. If the plant is stubborn and might not pop out, you may use a trowel or fork to gently pry the plant out.
5. remove excess soil: as soon as you’ve got removed the succulent from the vintage pot, use your arms or a tender-bristled brush to cast off any excess soil from the roots. Be gentle and keep away from pulling or tearing the roots.
6. Loosen the roots: lightly loosen any tangled or compacted roots through lightly pulling them apart together with your palms. this will help the roots spread out and promote healthy increase.
7. Inspect the roots: Take a close examine the roots and trim off any lifeless or broken roots with a couple of pruning shears. this can help save you the unfold of illnesses or pests to the new pot.
adequately casting off a succulent from its vintage pot calls for persistence and mild managing. through following those steps, you can correctly remove the plant and put together it for repotting in a brand new, healthful surroundings.
step-by-step process for repotting the succulent,
Repotting a succulent is an crucial a part of its care, and when finished efficaciously, can help promote wholesome growth and save you issues like root rot. here’s a step-by-step guide on how to repot your succulent.
Step 1: collect your supplies before you start repotting your succulent, accumulate all of the components you may need. This includes a brand new pot this is the best size on your plant, a well-draining potting blend, gloves, a trowel or scoop, pruning shears, and a watering can.
Step 2: remove the plant from its antique pot as soon as you have all your substances, it’s time to cast off your succulent from its old pot. start by means of lightly squeezing the edges of the pot to loosen the soil and roots. Then, carefully turn the pot on its side and gently faucet the bottom to loosen the plant. If the plant is cussed and won’t pop out, you could use a trowel or fork to softly pry it loose.
Step 3: eliminate excess soil once you’ve got eliminated the plant from its antique pot, use your arms or a soft-bristled brush to eliminate any extra soil from the roots. Be gentle and avoid pulling or tearing the roots.
Step4: look at the roots Take a near observe the roots and trim off any lifeless or broken roots with a pair of pruning shears. this may help save you the spread of illnesses or pests to the brand new pot.
Step 5: upload potting mix to the new pot upload a layer of potting blend to the bottom of the brand new pot. this may help offer a stable foundation for the plant and make certain right drainage.
Step 6: position the plant inside the new pot place the plant inside the new pot and regulate the location as wished. make sure the plant is centered and at the appropriate height inside the pot.
Step 7: upload greater potting mix Fill in around the plant with more potting blend, lightly tamping it down along with your palms or a trowel as you cross. go away a small gap among the pinnacle of the soil and the rim of the pot to make it less difficult to water the plant.
Step 8: Water the plant After repotting your succulent, give it an amazing drink of water to help settle the soil and hydrate the roots. Use a watering can with an extended spout to reach the soil with out disturbing the plant.
Step nine: Wait to fertilize Wait at the least every week earlier than fertilizing your newly repotted succulent. this can deliver the plant time to modify to its new pot and reduce the hazard of over-fertilization.
Step 10: display the plant After repotting your succulent, maintain a near eye on it for any signs and symptoms of strain or problems. make sure to modify your watering and care routine as needed to make certain the plant stays healthful and happy in its new pot.
repotting a succulent is a highly simple system, however it is vital to take some time and comply with the steps carefully to avoid negative the plant. by the usage of the proper supplies and techniques, you may help your succulent thrive in its new pot and revel in healthful increase for years yet to come.
common mistakes during repotting succulent
at the same time as repotting a succulent might also appear to be a sincere procedure, there are some common errors that can occur. right here are a number of the most common mistakes made during repotting succulents:
1. Choosing the wrong pot size: selecting the wrong pot size is one of the most not unusual mistakes made at some point of repotting. A pot this is too small can restriction the plant’s boom, whilst a pot this is too large can maintain too much moisture, leading to root rot.
2. Using the wrong potting mix: the use of a potting mix that does not drain properly can also result in root rot. Succulents require a properly-draining soil blend that lets in extra water to drain away speedy. A soil mix that retains an excessive amount of moisture can suffocate the roots and motive the plant to die.
3. Overwatering: Overwatering is one of the most not unusual reasons of dying for succulents. whilst repotting, it is important to remember of ways much water you give the plant. Wait until the soil is absolutely dry before watering, and be sure now not to water too regularly.
4. Underwatering: at the same time as overwatering is a not unusual mistake, underwatering is also an issue. Succulents require water to grow and thrive, and if they don’t get hold of enough water, they could turn out to be harassed and in the end die.
5 . Damaging the roots: throughout the repotting process, it’s vital to be mild with the plant’s roots. Tugging or pulling on the roots can harm them, main to stress and capability disorder.
6. Fertilizing too quickly: Fertilizing a newly repotted succulent may be harmful to the plant. Wait at least per week after repotting earlier than fertilizing, because the plant wishes time to alter to its new environment.
7. Not providing enough light: Succulents require plenty of sunlight to grow and thrive. in the event that they do not get hold of sufficient light, they could emerge as weak and leggy, making them extra liable to ailment.
repotting a succulent may be a truthful technique, however it’s important to avoid these common mistakes. via selecting the right pot length, the usage of the correct potting blend, watering properly, being gentle with the roots, waiting to fertilize, and presenting enough mild, you could help your succulent thrive in its new pot and revel in healthy increase for years to come.
Aftercare for Repotted Succulents
Congratulations on successfully repotting your succulent! you’ve got given your plant a brand new rent on existence, however your activity isn’t always over simply but. Now it is time to focus on aftercare to make sure your plant keeps to thrive in its new domestic.
right here are a few vital aftercare recommendations for repotted succulents:
1. Allow the soil to dry completely before watering: Succulents are drought-tolerant flora and can pass lengthy durations without water. whilst repotting, it’s important to allow the soil to dry out completely before watering to avoid overwatering and root rot. check the soil by way of sticking your finger into it; if it feels dry about an inch deep, it is time to water.
2. Water sparingly: whilst it’s time to water, achieve this sparingly. Succulents prefer rare however deep watering. Water till it starts to empty out of the bottom of the pot, then wait till the soil is dry before watering again. at some point of the iciness months or whilst the plant is dormant, reduce watering to once a month or much less.
3. provide good enough light: Succulents require vivid, direct daylight to thrive. location your repotted succulent in a location where it is able to acquire at the least six hours of direct daylight each day. if you are unable to offer this, bear in mind the usage of grow lights to complement herbal light.
4. avoid temperature extremes: Succulents opt for temperatures among 60-seventy five°F (15-24°C) all through the day and 50-55°F (10-30°C) at night. avoid setting your plant close to heating or cooling vents, as this could motive fluctuations in temperature that could strain the plant.
5. Keep an eye out for pests: Succulents are liable to pests like mealybugs, spider mites, and scale insects. often check out your plant for signs of infestation, including white fuzzy spots or webbing. if you observe pests, isolate the plant and deal with it with the best pesticide or insecticidal soap.
6. Fertilize sparingly: Succulents do now not require frequent fertilization, but a small amount of slow-release fertilizer can assist encourage wholesome boom. follow fertilizer sparingly, about once every three months, in the course of the developing season.
7. Watch for signs of stress: inspite of proper aftercare, repotting may be disturbing for succulents. look ahead to signs and symptoms of stress, which includes drooping leaves, shade changes, or wilting. if you notice any of those symptoms, alter your care routine as had to help your plant recover.
aftercare is a critical step within the repotting technique for succulents. by means of following these suggestions for watering, lights, temperature, pest manage, fertilization, and strain tracking, you can help your succulent thrive in its new pot and experience healthy boom for years yet to come.
Conclusion
Now you must have understood how to repot succulents. Repotting succulents is a rewarding task that ensures the continued health and growth of these fascinating plants. By understanding the signs of when to repot, choosing the right pot and soil, and following the proper repotting process, you can provide your succulents with the ideal conditions for thriving. Remember to care for your repotted succulents by providing adequate light, water, and temperature, and avoid common mistakes such as overwatering or using the wrong soil. With a little attention and care, your repotted succulents will continue to delight and enhance your living space with their unique beauty.
FAQ
Q1:when should I repot my succulents?
A1: There are several signs that indicate your succulent needs repotting. Look out for a root-bound plant, slow growth, crowded roots, water-related problems, an overgrown plant, poor drainage, yellowing leaves, or drying out too quickly. These signs suggest that your succulent has outgrown its current pot and requires repotting to continue thriving.
Q2: What type of soil should I use when repotting my succulent?
A2: Succulents require well-draining soil that doesn’t retain too much moisture. You can make your own soil mix by combining potting soil, perlite, and sand. Alternatively, you can purchase pre-made succulent soil mix from a garden center or online. The right soil should promote good drainage, provide adequate nutrients, allow for proper aeration, and have a slightly acidic pH level.
Q3: How do I choose the right container for repotting my succulent?
A3: When selecting a container for repotting your succulent, consider factors such as drainage, size, material, and aesthetic appeal. The container should have drainage holes to prevent waterlogging and promote healthy root growth. It should be appropriately sized, neither too small nor too large. Terracotta pots and plastic containers with drainage holes are commonly used. Additionally, choose a container that enhances the overall appearance of your succulent.
Q4: What supplies do I need for repotting succulents?
A4: The basic supplies you’ll need for repotting succulents include potting mix, a suitable container, a trowel or scoop, gloves, a watering can, and pruning shears. The potting mix should be well-draining and contain a mix of coarse sand, perlite, and organic matter. The container should have drainage holes and promote healthy root growth. The trowel or scoop helps in handling the potting mix, while gloves protect your hands. A watering can is useful for watering the succulent after repotting, and pruning shears help in trimming dead or damaged leaves.
Q5: How do I safely remove a succulent from its old pot?
A5: To safely remove a succulent from its old pot, start by watering the plant a day or two before repotting. This helps loosen the soil and prevents root damage. Prepare the new pot by adding a layer of potting mix to the bottom. Gently squeeze the sides of the old pot to loosen the soil and roots. Turn the pot on its side and tap the bottom to loosen the plant. If necessary, use a trowel or fork to gently pry the plant out. Remove any excess soil from the roots and inspect them for any dead or damaged parts. Trim as needed before placing the succulent in the new pot.
Q6. what is the best way to replant succulent?
A6. The best way to replant a succulent is to gently remove it from its current pot, inspect the roots, plant it in well-draining soil, and provide adequate sunlight and water sparingly.
Q7. should succulents be repotted wet or dry?
A7. Succulents should be repotted dry.